aXmag PDF to Flash converter Windows 版 オンラインマニュアル 目次
製品紹介ページへ
電子ブックへの目次の挿入
以下は、出力した電子ブックに目次を追加したサンプル ファイルです:
http://www.axmag.com/gallery/iPhone_users_guide_axmag_PDF_to_flash_page_flipping_magazine/index.html"目次" ボタンを追加するには、手動で出力ファイルを変更する必要があります。
PDF から電子ブックへの変換が完了したら、出力先フォルダーを開きます。以下のファイルが生成されています:

- setting.xml の修正
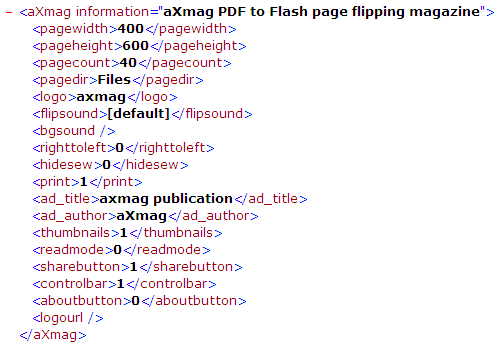
setting.xml をインターネット ブラウザで表示すると、以下のように表示されます:
テキスト エディタで setting.xml を開き、以下の行が含まれているのを確認します:
<aXmag information= "aXmag PDF to Flash page flipping magazine"><pagewidth>400</pagewidth>
<pageheight>600</pageheight><pagecount>2</pagecount><pagedir>Files</pagedir><logo>axmag</logo>
<flipsound>[default]</flipsound><bgsound></bgsound><righttoleft>0</righttoleft><hidesew>0</hidesew>
<print>1</print><ad_title>axmag publication</ad_title><ad_author>aXmag</ad_author>
<thumbnails>1</thumbnails><readmode>0</readmode><sharebutton>1</sharebutton><controlbar>1</controlbar>
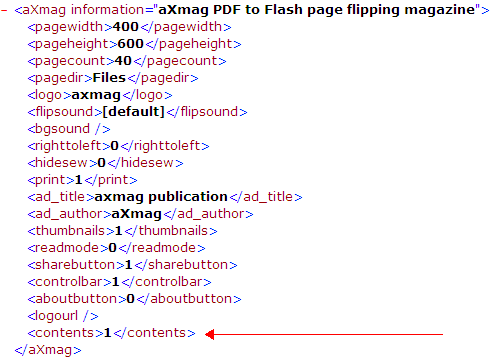
<aboutbutton>0</aboutbutton><logourl></logourl></aXmag>最後の </aXmag> タグの前に、以下のタグを追加します:
<contents>1</contents>settings.xml は以下のようになります:
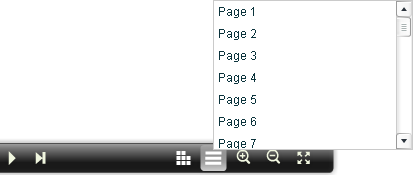
setting.xml に変更を反映して index.html を開くと、ナビゲーション ツールバーに "目次" ボタンが追加されています。
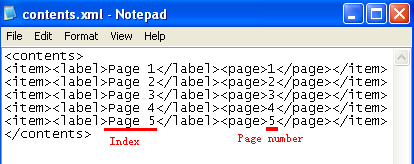
contents.xml の編集 contents.xml をテキスト エディタで開いて、目次を追加します:
<label></label> タグの間に、目次に含めるページ タイトルを入力します。
<page></page> タグの間には、対応するページ数を入力します。