An in-depth look at image tracking and how to pick the best possible marker
When choosing an image to use as a marker with the Kudan image tracker, there are a few things to bear in mind in order to ensure reliably detection and smooth tracking.
The image tracker performs best when used on rich and highly textured images, so it’s better to have a marker containing lots of detail, rather than bold lines or blocky designs. The latter will have less recognisable local regions, so detection will suffer.
For example, the following marker (Fig. 1) has nice bold lines, but this makes detection very difficult, as there is very little for the tracker to latch on to (Fig. 2). In these images, the matches between points of interest in the marker (top) and camera image (bottom) are drawn in blue. Matches which conform to the final hypothesis are drawn in green; so in this first example, where no detection is made, there are not enough of these to make a detection.

Fig. 1. A poor marker, containing only large-scale blocky features
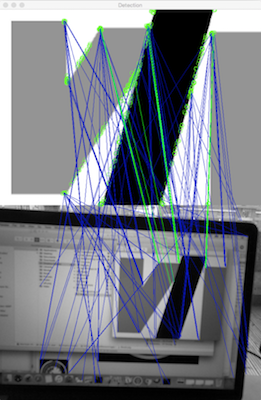
Fig. 2. Exclusively large-scale, low-detailed content makes this marker hard to detect
The following marker (Fig. 3) is much the same, except for the addition of some more detail, and has no problem being detected (Fig. 4 – observe the green match lines amongst the blue are numerous and show the correct relationship between marker and camera image):

Fig. 3. The addition of more detail makes this a better marker
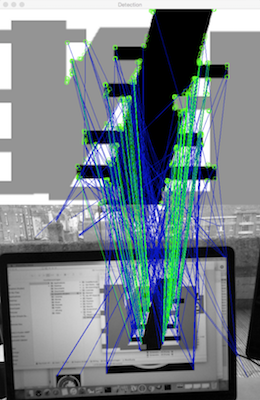
Fig. 4. The extra detail makes this marker much easier to detect
It’s not enough for the image tracker to find a set of matching regions between the marker and camera images: it needs to find a coherent geometric relationship amongst these matches. While this means that the detector is much less likely to make false detections (because the appearance and geometry need to be in agreement), it means that markers with repeating patterns or self-similar sections are not good. Similar patterns at different places in the image will be confused with each other, making it more difficult to work out where the marker is, and making it harder to detect in difficult conditions. For example the individual elements on the following marker (Fig. 5) are easily recognisable, but the detector cannot distinguish them (Fig. 6), and so no detection is made (the blue lines show possible matches being found between different instances of the same shape, but no consistent pattern is found).
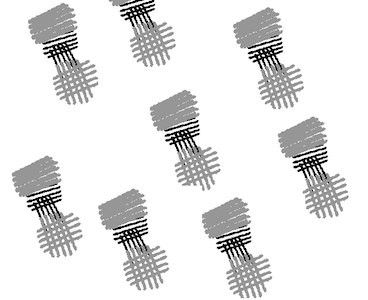
Fig. 5. A difficult to detect marker made of repeating elements
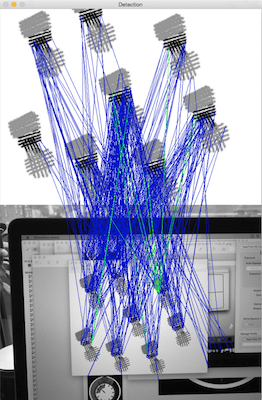
Fig. 6. Individual image elements can be matched, but their repetition prevents a coherent geometric match
The two issues above (problems with blocky designs and repeating patterns) mean that using a marker containing grids or other such simple, repeating designs is likely to cause the tracker to miss it completely, such as the following marker (Fig. 7) failing to detect even when there is little else in view (Fig. 8):

Fig. 7. A marker containing grids or other simple, repeating content will be difficult to detect
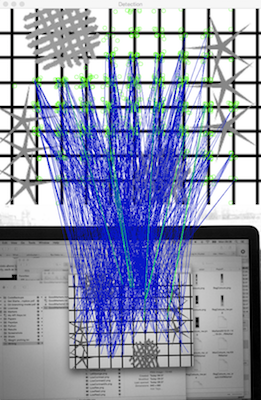
Fig. 8. Despite the fine details, the self-similar grid prevents detection
One of the strengths of the image tracker is that it can cope with changes in scale, which means a marker can be identified from either close or far away. For this to work there should be image content visible over a range of scales, and so a marker consisting of only fine detail will not be detected from a distance, because the recognisable elements of the image will not be easily resolved from further away. For example, this text-only marker can be reliably detected only from quite close, where the text is clearly visible (Fig. 9), whereas from only slightly further away there is insufficient resolution to recognise it (Fig. 10):

Fig. 9. A marker containing only fine-scale detail, which can be detected at certain distances

Fig. 10. This marker becomes difficult to detect at larger distances because the exclusively fine-scale details become indistinct
Assuming detection succeeds, the tracking stage will not have a problem with repeating patterns (it only searches for matches locally), but it will still have trouble if the marker does not have detail at a large enough range of scales. If there is not sufficient detail visible at some scales, the pose could become unstable when viewed from some distance, or when blurred (from fast motion or camera focus). This is shown in the following example, where a marker consisting of features at a single small scale (Fig. 11) has problems being tracked when the camera image is blurred (Fig. 12)
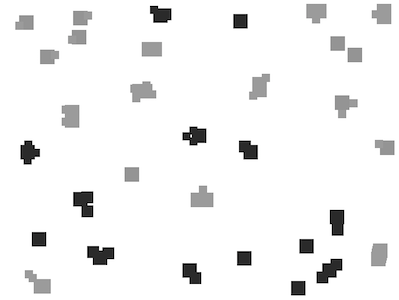
Fig. 11. A marker with only small scale features will lead to less robust tracking
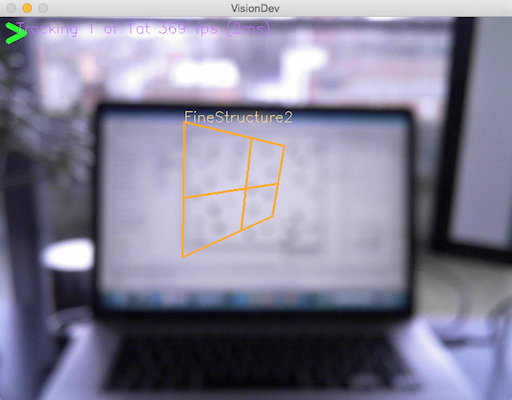
Fig. 12. Small scale content is lost when the image is blurred, and so tracking suffers if there is no detail at larger scales
whereas a very similar marker with added details at a larger scale (Fig. 13) survives the blurring with a much more correct pose (Fig. 14):

Fig. 13. A marker with detail over a range of scales will give more robust tracking
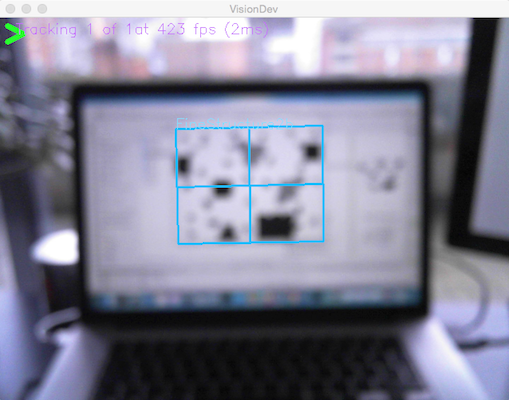
Fig. 14. A marker with detail over a range of scales tracks well despite image blur, because larger scale features remain visible
Another criterion for a good trackable marker is that it have a good distribution of texture across it. If all of the detail is concentrated on one side of the marker, points at that end will be tracked well, but with nothing to lock the other end in place, the pose will be less stable. An unstable pose can cause the tracker to fail more easily, since matches will be harder to find as the marker moves. As an example, consider the following marker (Fig. 15) which has a highly textured region only on one side. The detector finds this easily, but since there is nothing on the right for the tracker to use, the resulting pose estimate can diverge significantly (Fig. 16):

Fig. 15. A marker with poorly distributed content could lead to unstable tracking
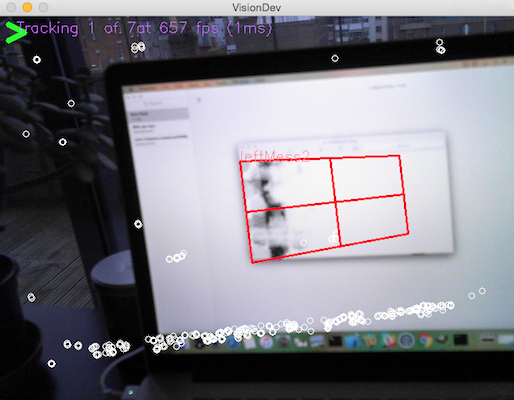
Fig. 16. Due to the lack of content on the right of the marker, the tracker has problems in finding a good overall pose
Keeping the same marker but adding similar details across the rest of the image solves this problem (Fig. 17), as now the tracker can use the whole image to determine its position even under significant motion (Fig. 18):
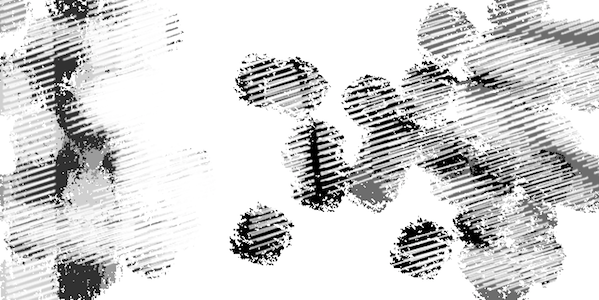
Fig. 17. A marker with content distributed across the image will enable better tracking
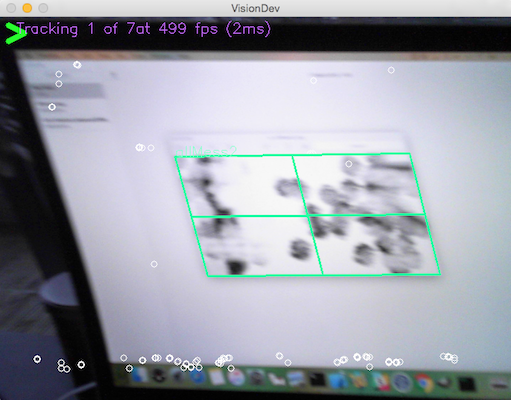
Fig. 18. Detail distributed across a marker can ensure the tracker gives a good pose even under difficult conditions
Finally, a good property for markers to have, for both detection and tracking, is for there to be good contrast in the image intensities. High contrast helps both the detector and tracker to recognise parts of the image, and be more stable under different illumination conditions. This marker (Fig. 19) has a lot of trouble being detected, and it demonstrates that although there may be enough detail in the marker image itself (Fig. 20, top), the image of the marker seen by the camera does not have enough contrast for the same detail to be seen (Fig. 20, bottom).

Fig. 19. A marker with low contrast will make detection and tracking more difficult
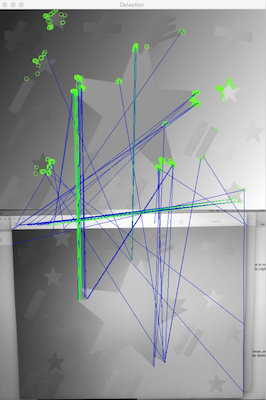
Fig. 20. This low-contrast marker cannot be detected, because there is insufficient detail visible to the camera
A more subtle issue is that a marker may appear to have high contrast, but where this contrast is entirely based on the difference in colour. Colour information is not used by the software, so some details in the image can be much less visible when it is converted to greyscale. For example, the following marker (Fig. 21) appears to have very high contrast, whereas what the detector sees (Fig. 22) shows it will be very difficult to use in practice:

Fig. 21. A marker with high contrast due to differences in colour can still have poor contrast in greyscale
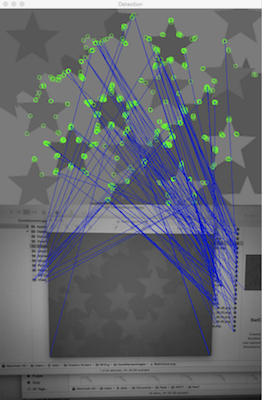
Fig. 22. This marker has poor greyscale contrast (despite having very distinct colours), and cannot be detected
On the other hand, the same pattern rendered in very different shades of grey (Fig. 23) presents no problem (Fig. 24)

Fig. 23. A marker with the same pattern as the coloured marker above (Fig. 21)
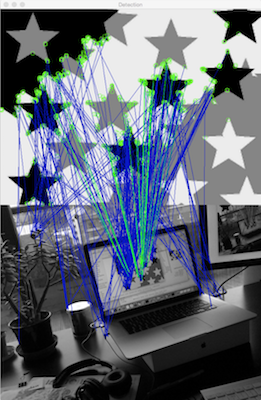
Fig. 24. High greyscale contrast means this marker can be detected easily, unlike the same pattern rendered only with distinct colours (Fig. 21)
All of the above are general guidelines; a marker could fail to meet any or a number of these suggestions and still be good, at least in some conditions – the best way to find out if a particular image will make a good marker is to try it and see if it works well in its intended application. But keeping the above in mind when choosing or designing marker images will help to get the best performance out of the Kudan image tracker.