This quick tutorial will show you how to set up your Unity project to build for the iOS platform.
Application Identifier
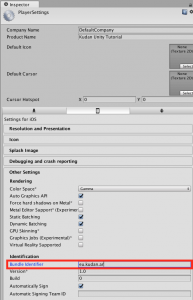
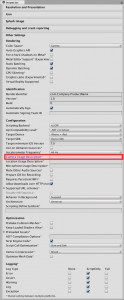
Make sure your Bundle/Application Identifier is correct for the API Key you’re using. You can find your project’s Application Identifier by clicking the [Set App/Bundle ID] button on the Kudan Trackerscript, or by going to Edit -> Project Settings -> Player and open Other Settings in the iOS tab.
The Application ID be either:
- The ID you entered when your free key was generated by XLsoft, in the format “com.companyName.productName”.
- If you are using the Development License Key,
com.xlsoft.kudanar.
Click here for the development license key.
To see if the entered API Key is valid for the corresponding Application ID, run the app in Play Mode. View message in the console mentioning whether or not the API Key is valid. Or view in console log when building for iOS/Android.
If the Application Identifier is incorrect, the Tracker will not run and camera view will be blank/black.
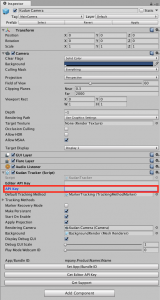
Camera Usage Description
Add a camera usage description in the appropriate field. Since Kudan uses the camera, the app will crash on iOS 10+ if an app does not contain a usage description.
Usage Descriptions
If you add any extra features to your app that require additional hardware components, such as GPS, remember to add usage descriptions for those to save yourself a headache later.
Add BuildHelper
Xcode projects, built with Unity 2019 and later, now includes the UnityFramework within the Standard iOS libraries. The Kudan framework supports fat binary, so builds cannot be compiled with Bitcode enabled. This UnityFramework also requires [Enable Bitcode] to be set to [No].

Starting with Unity 2019, you can specify Xcode project settings from Unity by adding the BuildHelper.cs file to your Unity project. Following the steps below.
In Project pane, create an Editor folder in the Assets folder by right-clicking and selecting [Create > Folder]. Right-click on the Editor folder created, select [Create > C # Script], and name the file BuildHelper.cs.

Open BuildHelper.cs with Visual Studio or other editor and replace it with the following code.
#if UNITY_2019_1_OR_NEWER
#if UNITY_IPHONE

using System.IO;
using UnityEditor;
using UnityEditor.Callbacks;
using UnityEditor.iOS.Xcode;

public class BuildHelper
{
    [PostProcessBuildAttribute (1)]
    public static void OnPostProcessBuild (BuildTarget target, string path)
    {
        if (target == BuildTarget.iOS)
        {
            var projectPath = PBXProject.GetPBXProjectPath (path);
            var project = new PBXProject ();
            project.ReadFromString (File.ReadAllText (projectPath));

            var targetGUID = project.GetUnityFrameworkTargetGuid ();
            project.SetBuildProperty (targetGUID, "ENABLE_BITCODE", "NO");
            var iphoneGUID = project.GetUnityMainTargetGuid ();
            project.SetBuildProperty (iphoneGUID, "ENABLE_BITCODE", "NO");

            File.WriteAllText (projectPath, project.WriteToString ());
        }
    }
}

#endif
#endif
Build the Xcode project
Build the app by going to File -> Build Settings, selecting iOS and clicking Build. Unity will build the selected scenes and produce an XCode project in the selected folder.
Depending on your versions of Unity and Xcode, you may be able to select Build and Run instead. In this instance, Unity will automatically open the built project in Xcode and run it on a connected device, if possible. This is not always the case, however, so it is usually safer to simply click Build and open the project yourself unless you know for a fact that your particular versions of Unity and Xcode are compatible.
Set up the Xcode project
In the Xcode project, there are two more things we need to set. If you created the BuildHelper script, skip the first step. First, select the project in the tree view on the left hand side and click the Build Settings tab. Scroll down to the Build Options section and find the entry marked Enable Bitcode. Set it to NO. Kudan’s framework is a fat binary and cannot be compiled in an app with bitcode enabled. Skip this step if you created the BuildHelper script.
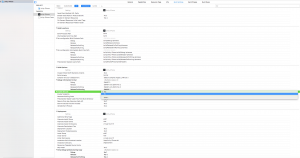
Next, check that you have a valid Provisioning Profile. With Xcode 8 and later, profiles will automatically be taken care of by signing into Apple, so all you should need to do is select a development team in the Signing section of the General tab. In older versions of Xcode, you’ll have to make sure that the correct profile has been selected, or that you are using a wildcard Provisioning Profile.
If everything has been set up, click the play button in the upper left corner of the screen and the app should build and run. If you have a device connected to your machine via USB, the app will run on that device once the build has finished.