教室解析アプリケーションは、インテル® ディストリビューションの OpenVINO™ ツールキットに含まれる推論エンジンを使用します。アプリケーションは、複数のニューラル・ネットワークの使用法を組み合わせて、ライブの教室から次のメトリックを検出する例を示します。
集中度指数: 教室の生徒の全体的な集中度をキャプチャーします。教師/黒板を見ている生徒、ノートを取っている生徒、読み書きしている生徒は、クラスで集中している生徒としてマークされます。このメトリックは、各生徒の頭部姿勢の値を取得して平均を計算する head-pose-estimation-adas-0001 を使用して計算します。
参加指数: リアルタイム・クラス参加状況 (質問に答えている生徒、質問するため手を挙げている生徒など) をキャプチャーします。このメトリックは、人を見つけて、座っている/立っている/手を挙げているなど、現在の動作を同時に予測する person-detection-action-recognition-0005 を使用して計算します。
幸福度指数: emotions-recognition-retail-0003 事前トレーニング済みモデルを使用して、生徒の平均感情を検出し、教室のリアルタイム幸福度を計算します。
出席者: クラスの総人数とクラス中の欠席者をキャプチャーします。face-reidentification-retail-0095 事前トレーニング済みモデルを使用して、教室の個々の顔を検出します。
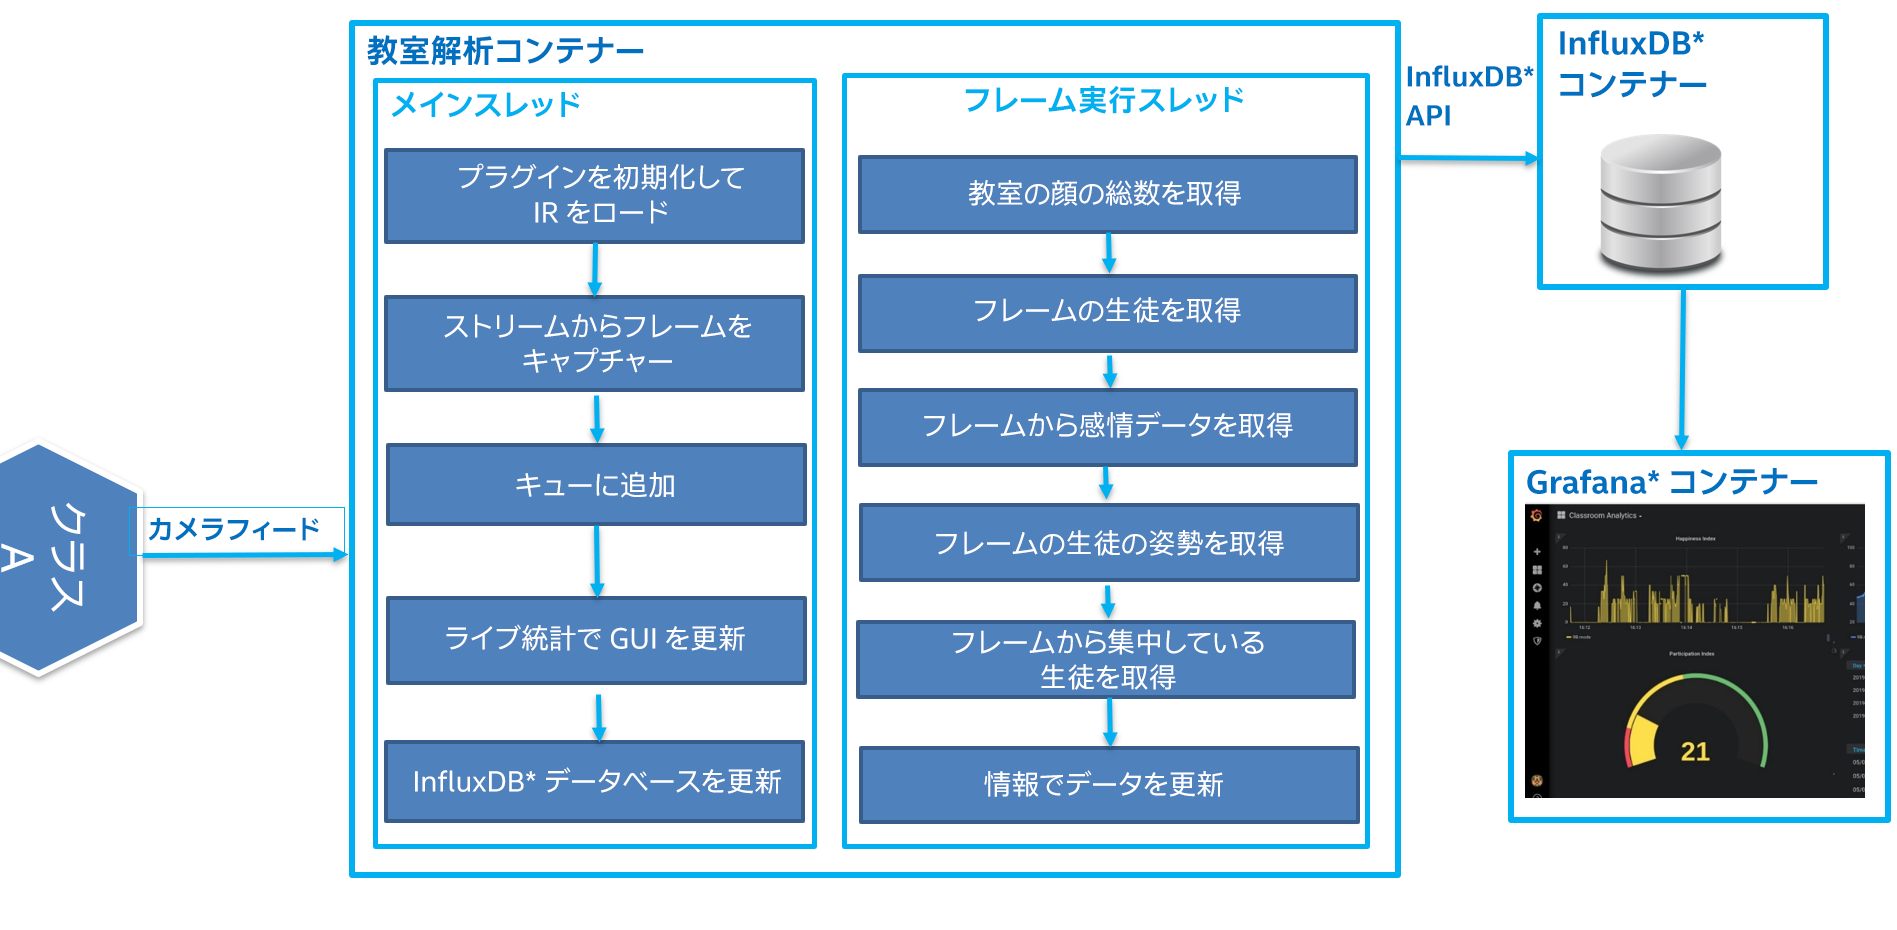
図:2: リファレンス実装のアーキテクチャー概略図
教室解析アプリケーションは、各教室の Docker* コンテナーとして配備されます。起動時に、アプリケーションはコマンドライン・パラメーターを読み取り、推論エンジンに 6 つのモデルをロードします。これらのネットワークを使用して、アプリケーションはフレームの推論を行い、ユーザーの量的メトリックを作成します。各教室のメトリックは InfluxDB* データストア・コンテナーに収集され、Grafana* コンテナーを使用して視覚化されます。
リポジトリーのダウンロード
リポジトリーをダウンロードするか、git clone でリポジトリーのクローンを作成します。
git がホストシステムにインストールされていない場合、"sudo apt-get update && apt-get install git" コマンドを使用してインストールします。
必要条件のインストール
教室に出席している生徒のギャラリーを追加します。フレームの顔を認識するには、教室解析アプリケーションに推論イメージのギャラリーが必要です。クローンしたフォルダーの内部の生徒フォルダーに生徒の前向きの顔を追加します。各生徒に複数のイメージを追加できます。イメージファイルの名前は id_name.png のように設定します。
ファイルの場所: resources/
教室の時間割を追加します。教室のエントリーは timetable.txt ファイルで設定します。
ファイルの場所: classroom_analytics/timetable.txt
次のようにプロキシー/DNS IP アドレスを追加して、設定ファイル /etc/resolv.conf を更新します。
nameserver < プロキシーまたは DNS IP >
教室解析アプリケーションは、vanilla Ubuntu* システムのいくつかのソフトウェア・パッケージ [ docker および docker-compose] に依存します。依存ファイルをインストールするには、端末を開き、クローンしたリポジトリーのディレクトリーに移動して、次のコマンドを実行します。
スクリプトを実行して、ソフトウェア・パッケージをダウンロードしてインストールします。
クローンした/ダウンロードしたファイルの実行が許可されていない場合、"chmod +x install_docker.sh" コマンドを実行してファイルの実行を許可します。
cd intelligent-classroom
sudo ./install_docker.sh
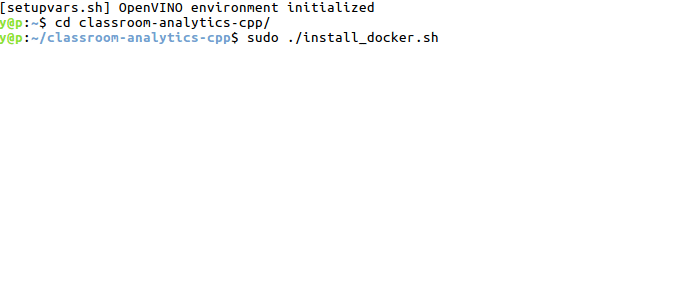
図:3: ホストでインストーラー・スクリプトを実行する
インストールが完了すると、Docker* サービスが自動的に開始します。次のように入力して確認できます。
sudo systemctl status docker
出力は次のようになります。
docker.service - Docker Application Container Engine
Loaded: loaded (/lib/systemd/system/docker.service; enabled; vendor preset: enabled)
Active: active (running) since Mon 2019-04-18 01:22:00 PDT; 6min ago
Docs: https://docs.docker.com
Main PID: 10647 (dockerd)
Tasks: 21
CGroup: /system.slice/docker.service
docker-compose のインストールをテストします。
sudo docker-compose --version

docker-compose version 1.24.0, build 1110ad01
アプリケーションのセットアップと実行の自動スクリプト
教室解析アプリケーションを初めて使用する場合、必要条件を完了して依存ファイルをインストールした後、フォルダーに含まれる起動スクリプトを実行します。スクリプトは、1 つの教室のコンテナーのビルド、インストール、作成、実行を行います。
sudo ./launch.sh
スクリプトの実行中に設定できるフラグがあります (オプション)。
sudo ./launch.sh -h

script usage: $(launch.sh) [-r Classroom Name] [-c Ip Camera Link] [-i InfluxDB Ip]
例:
sudo ./launch.sh -r 9B -i 172.21.0.6
注: InfluxDB* コンテナーのデフォルトのスタティック IP は 172.21.0.6 に設定します。この値は Grafana* との接続の確立に使用されます。
教室解析アプリケーションのチャートを確認するには、次の手順に従います。
Grafana* の視覚化の設定
ホスト・コンピューターでブラウザーを開いて、http://localhost:3000 に移動します。Grafana* にログインするときにパスワードの変更画面が表示された場合はスキップしてください。
デフォルト設定 (ユーザー admin およびパスワード admin) でログインします。
左パネルにある [Configuration] アイコンをクリックします。
[+ Add data source] ボタンをクリックして下記の情報を設定します。
InfluxDB* コンテナーからデータソースを追加します。
- Type: InfluxDB
- Name: InfluxDB
- URL: http://(influxDBContainerIpaddress/172.21.0.6):8086
- Database: Analytics
- [Save and Test] をクリックします。
InfluxDB* コンテナーのデフォルト IP: 172.21.0.6
図:4: Grafana* に InfluxDB* データストアを追加する
- Grafana* インポート・ダッシュボードから intelligent-classroom/resources/Grafana.json をインポートします。
図:5: Grafana* にサンプル・ダッシュボードを追加する
- 事前定義済み Grafana* ダッシュボードからライブメトリックをモニターします。
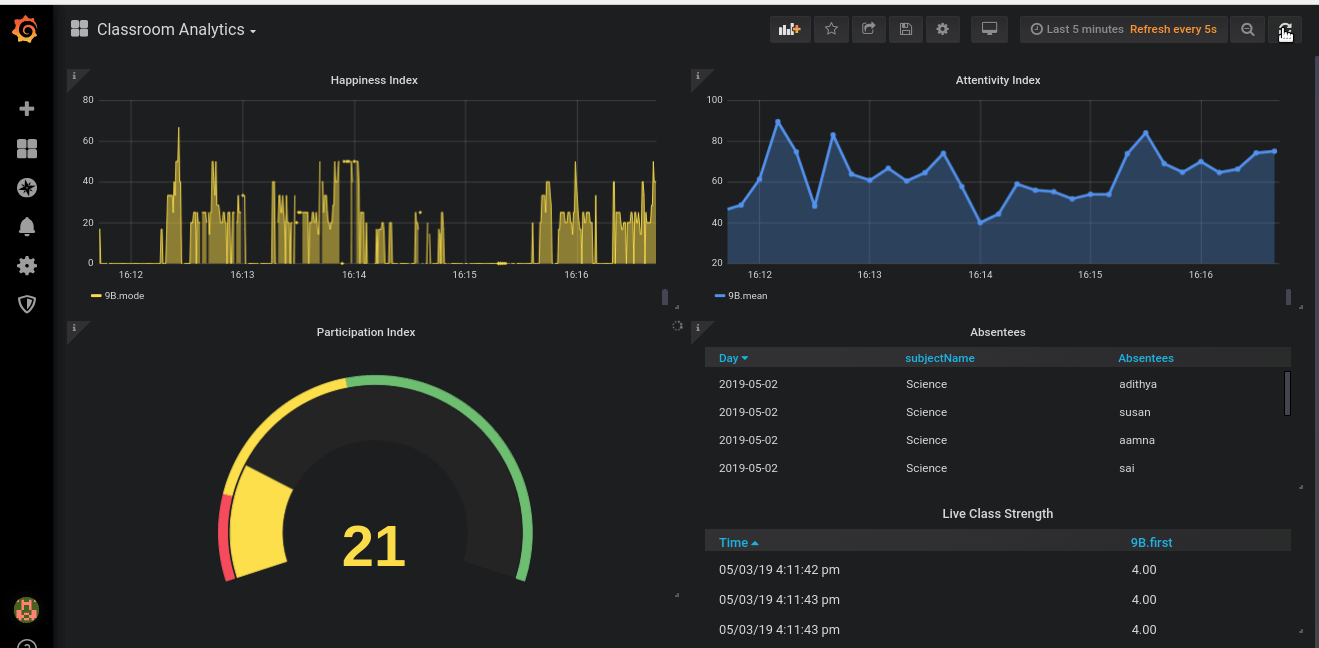
図:6: 教室のライブデータのチャート
チャートにデータが表示されない場合、ウィジェット名 (Happiness Index など) で編集オプションを選択して、教室の名前を変更します。
インテル® プロセッサー・グラフィックス (GPU) で実行する (オプション)
デフォルトでは、アプリケーションは CPU で実行されます。フラグを使用して、GPU で実行するモデルを指定できます。
下記のように起動スクリプトの実行ファイルを変更します。
docker exec -it "$containerId" /bin/bash -c "source /opt/intel/openvino/bin/setupvars.sh &&

/root/inference_engine_samples_build/intel64/Release/classroom-analytics

-pdc=/resources/intel/person-detection-action-recognition-0005/FP32/person-detection-action-recognition-0005.xml

-c=/resources/intel/face-detection-adas-0001/FP32/face-detection-adas-0001.xml

-lrc=/resources/intel/landmarks-regression-retail-0009/FP32/landmarks-regression-retail-0009.xml

-pc=/resources/intel/head-pose-estimation-adas-0001/FP32/head-pose-estimation-adas-0001.xml

-sc=/resources/intel/emotions-recognition-retail-0003/FP32/emotions-recognition-retail-0003.xml

-frc=/resources/intel/face-reidentification-retail-0095/FP32/face-reidentification-retail-0095.xml

-fgp=/opt/intel/openvino/inference_engine/samples/classroom_analytics/faces_gallery.json

-i="$camera" --influxip=$influxIp --cs=$classroom -d_fd=GPU -d_hp=GPU -d_em=GPU -d_act=GPU -d_reid=GPU -d_lm=GPU"
教室解析アプリケーションを実行するには、「アプリケーションのセットアップと実行の自動スクリプト」の手順に従います。
インテル® Movidius™ VPU で実行する (オプション)
デフォルトでは、アプリケーションは CPU で実行されます。HDDL フラグを使用して、インテル® Movidius™ VPU で実行するモデルを指定できます。
注: インテル® Movidius™ VPU で推論を実行する場合、モデルの FP16 バージョンが必要です。
インテル® Movidius™ VPU プラグインで実行する手順
https://docs.openvinotoolkit.org/2019_R3/_docs_install_guides_installing_openvino_linux.html (英語) を使用してインテル® ディストリビューションの OpenVINO™ ツールキットをインストールします。
インテル® Movidius™ VPU ドライバーをホストマシンにインストールします。
注: 同じホストマシンにインストールするには下記のリンクを使用します。
https://docs.openvinotoolkit.org/latest/_docs_install_guides_installing_openvino_linux_ivad_vpu.html (英語)
クローンしたディレクトリーにある docker-compose.yml ファイルの 39 行目 "- /dev/ion:/dev/ion" をコメントアウトして有効にします。
次のコマンドを使用し、別の端末で hddldaemon を (ホストで) 実行します。
source /opt/intel/openvino/bin/setupvars.sh && $HDDL_INSTALL_DIR/bin/hddldaemon下記のように起動スクリプトの実行ファイルを変更します。
docker exec -it "$containerId" /bin/bash -c "source /opt/intel/openvino/bin/setupvars.sh &&

/root/inference_engine_samples_build/intel64/Release/classroom-analytics

-pdc=/resources/intel/person-detection-action-recognition-0005/FP16/person-detection-action-recognition-0005.xml

-c=/resources/intel/face-detection-adas-0001/FP16/face-detection-adas-0001.xml

-lrc=/resources/intel/landmarks-regression-retail-0009/FP32/landmarks-regression-retail-0009.xml

-pc=/resources/intel/head-pose-estimation-adas-0001/FP16/head-pose-estimation-adas-0001.xml

-sc=/resources/intel/emotions-recognition-retail-0003/FP16/emotions-recognition-retail-0003.xml

-frc=/resources/intel/face-reidentification-retail-0095/FP32/face-reidentification-retail-0095.xml

-fgp=/opt/intel/openvino/inference_engine/samples/classroom_analytics/faces_gallery.json

-i="$camera" --influxip=$influxIp --cs=$classroom -d_fd=HDDL -d_hp=HDDL -d_em=HDDL -d_act=HDDL"
- 教室解析アプリケーションを実行するには、「アプリケーションのセットアップと実行の自動スクリプト」の手順に従います。
サポートしているモデル:
- Action_Recognition - person-detection-action-recognition-0005.xml
- Face_Detection - face-detection-adas-0001.xml
- Head_Pose - head-pose-estimation-adas-0001.xml
- Emotions_Recognition - emotions-recognition-retail-0003.xml
サポートしていないモデル:
- Face_reidentification - face-reidentification-retail-0095.xml
- Landmarks_Regression - landmarks-regression-retail-0009.xml
インテル® Movidius™ ニューラル・コンピュート・スティックで実行する (オプション)
デフォルトでは、アプリケーションは CPU で実行されます。フラグを使用して、インテル® Movidius™ ニューラル・コンピュート・スティックで実行するモデルを指定できます。
注: インテル® Movidius™ ニューラル・コンピュート・スティックで推論を実行する場合、モデルの FP16 バージョンが必要です。
インテル® Movidius™ ニューラル・コンピュート・スティック・プラグインで実行する手順
コマンドを手動で実行します。
sudo docker run --network=host --env="DISPLAY" --volume="$HOME/.Xauthority:/root.Xauthority:rw" -it --privileged -v /dev:/dev classroom-analytics
フラグを使用して、インテル® Movidius™ ニューラル・コンピュート・スティックで実行するモデルを指定して下記の実行ファイルを実行します。
cd root/inference_engine_samples_build/intel64/Release/
source /opt/intel/openvino/bin/setupvars.sh
./classroom-analytics -pdc=/resources/intel/person-detection-action-recognition-0005/FP16/person-detection-action-recognition-0005.xml -c=/resources/intel/face-detection-adas-0001/FP16/face-detection-adas-0001.xml -lrc=/resources/intel/landmarks-regression-retail-0009/FP32/landmarks-regression-retail-0009.xml -pc=/resources/intel/head-pose-estimation-adas-0001/FP16/head-pose-estimation-adas-0001.xml -sc=/resources/intel/emotions-recognition-retail-0003/FP16/emotions-recognition-retail-0003.xml -frc=/resources/intel/face-reidentification-retail-0095/FP32/face-reidentification-retail-0095.xml -fgp=/opt/intel/openvino/inference_engine/samples/classroom_analytics/faces_gallery.json -i=/resources/classroom.mp4 --influxip=172.21.0.6 --cs=9B -d_fd=MYRIAD -d_hp=MYRIAD -d_em=MYRIAD -d_act=MYRIAD
GUI で表示するときにエラーになる場合は、コンテナーにログインする前に xhost +SI:localuser:root を実行します。
教室解析アプリケーションのチャートを確認するには、「Grafana* の視覚化の設定」の手順に従います。
サポートしているモデル:
- Action_Recognition - person-detection-action-recognition-0005.xml
- Face_Detection - face-detection-adas-0001.xml
- Head_Pose - head-pose-estimation-adas-0001.xml
- Emotions_Recognition - emotions-recognition-retail-0003.xml
サポートしていないモデル:
- Face_reidentification - face-reidentification-retail-0095.xml
- Landmarks_Regression - landmarks-regression-retail-0009.xml
コンテナーを手動で実行する (オプション)
上記のコマンドはイメージから 3 つのコンテナーを作成し、ブリッジ・ネットワークを作成して IP アドレスを割り当て、コンテナー間の接続を確立して固定記憶域を追加します。
新しい端末を開き、コンテナーにログインしてアプリケーションを開始します。
"docker-compose up -d" を実行してバックグラウンドでコンテナーを実行できます。

図:7: docker-compose でコンテナーを実行する
環境のセットアップとアプリケーションの実行の手動プロシージャー (オプション)
環境の設定
依存ファイルをすべてインストールしたら、教室解析、InfluxDB*、Grafana* のコンテナーをビルドします。
注: 最新のインテル® ディストリビューションの OpenVINO™ ツールキット R3 (英語) リリースをダウンロードして、ダウンロードした .tgz ファイルをクローンしたディレクトリーにコピーします。クローンしたディレクトリーから次のコマンドを実行します。
sudo ./setup.sh
setup.sh スクリプトは次のタスクを行います。
- classroom-analytics Docker* イメージのビルド。
- イメージの依存ファイルのダウンロード/インストール。
- 必要な事前トレーニング済みモデルのインストール。
- faces_gallery ファイルの作成。
- 必要な環境変数の設定。
- Grafana* および InfluxDB* コンテナーイメージの取得と作成。
setup.sh スクリプトの実行が完了すると、3 つの Docker* イメージが表示されます。
sudo docker images

アプリケーションの実行
教室解析アプリケーションを開始するには、下記の手順に従います。
新しい端末を開き、クローンしたディレクトリーに移動します (教室解析アプリケーション)。
cd intelligent-classroom
- To get the Container ID of your running container, use the following commands
sudo docker-compose up
sudo docker ps -aqf "name=classroom-analytics"
Exp:92de4bfxxxxx
コンテナーにログインする前に、ホストの端末で 'xhost +' を実行してコンテナーに GUI でアクセスできるようにします。
次のコマンドを使用してコンテナーにログインします。
sudo docker exec -it <container ID> /bin/bash
アプリケーションの実行中に使用するフラグを次に示します。
--cs, --section (value:DEFAULT)
specify the class section
--d_act, --device (value:CPU)
Optional. Specify the target device for Person/Action Detection Retail (CPU, GPU, HDDL).
--d_em, --device (value:CPU)
Optional. Specify the target device for Emotions Retail (CPU, GPU, HDDL).
--d_fd, --device (value:CPU)
Optional. Specify the target device for Face Detection Retail (CPU, GPU, HDDL).
--d_hp, --device (value:CPU)
Optional. Specify the target device for Headpose Retail (CPU, GPU, HDDL).
--d_lm, --device (value:CPU)
Optional. Specify the target device for Landmarks Regression Retail (CPU, GPU, HDDL).
--d_reid, --device (value:CPU)
Optional. Specify the target device for Face Reidentification Retail (CPU, GPU, HDDL).
--db_ip, --influxip (value:172.21.0.6)
specify the Ip Address of the InfluxDB container
-h, --help (value:true)
Print help message.
-i, --input
Path to input image or video file.
--no-show, --noshow (value:0)
specify no-show = 1 if don't want to see the processed Video
フラグに適切な属性を指定して教室解析アプリケーションを実行します (クラスセクション、IP カメラなど)。
cd root/inference_engine_samples_build/intel64/Release/
source /opt/intel/openvino/bin/setupvars.sh
./classroom-analytics -pdc=/resources/intel/person-detection-action-recognition-0005/FP32/person-detection-action-recognition-0005.xml -c=/resources/intel/face-detection-adas-0001/FP32/face-detection-adas-0001.xml -lrc=/resources/intel/landmarks-regression-retail-0009/FP32/landmarks-regression-retail-0009.xml -pc=/resources/intel/head-pose-estimation-adas-0001/FP32/head-pose-estimation-adas-0001.xml -sc=/resources/intel/emotions-recognition-retail-0003/FP32/emotions-recognition-retail-0003.xml -frc=/resources/intel/face-reidentification-retail-0095/FP32/face-reidentification-retail-0095.xml -fgp=/opt/intel/openvino/inference_engine/samples/classroom_analytics/faces_gallery.json -i=<Ip Of the Ip Camera/Location of video File (/resources/classroom.mp4)/ cam> --influxip=<Ip of InfluxDB Container/172.21.0.6> --cs=9B
InfluxDB* コンテナーのデフォルトのスタティック IP は 172.21.0.6 に設定します。
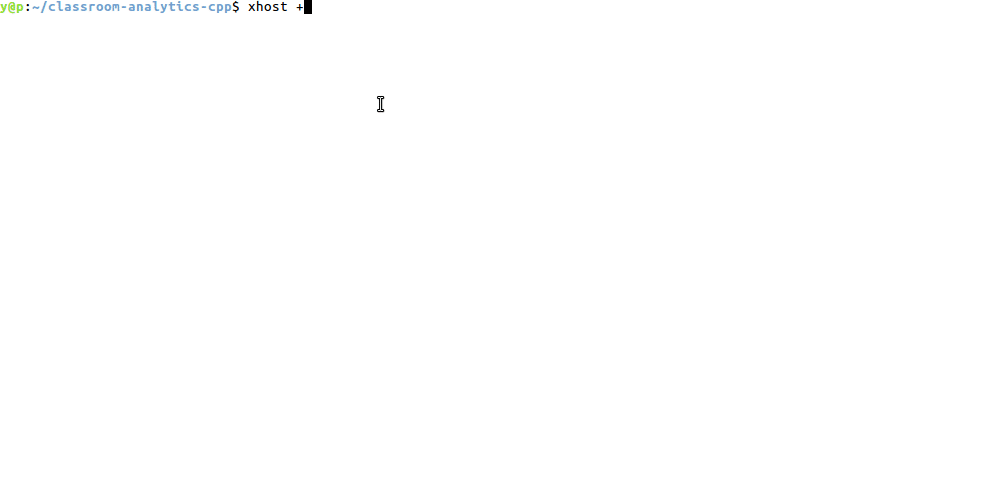
図:8: 教室解析アプリケーションを実行する
GUI で表示するときにエラーになる場合は、コンテナーにログインする前に xhost +SI:localuser:root を実行します。
InfluxDB* コンテナーのデフォルト IP: 172.21.0.6
図:9: Grafana* に InfluxDB* データストアを追加する
- Grafana* インポート・ダッシュボードから Grafana.json をインポートします。
図:10: Grafana* にサンプル・ダッシュボードを追加する
- 事前定義済み Grafana* ダッシュボードからライブメトリックをモニターします。
図:11: 教室のライブデータのチャート
チャートにデータが表示されない場合、ウィジェット名 (Happiness Index など) で編集オプションを選択して、教室の名前を変更します。
教室を追加する
現在のアプローチで、教室を追加して定義されたメトリックの視覚化と解析のためにライブデータを収集できます。
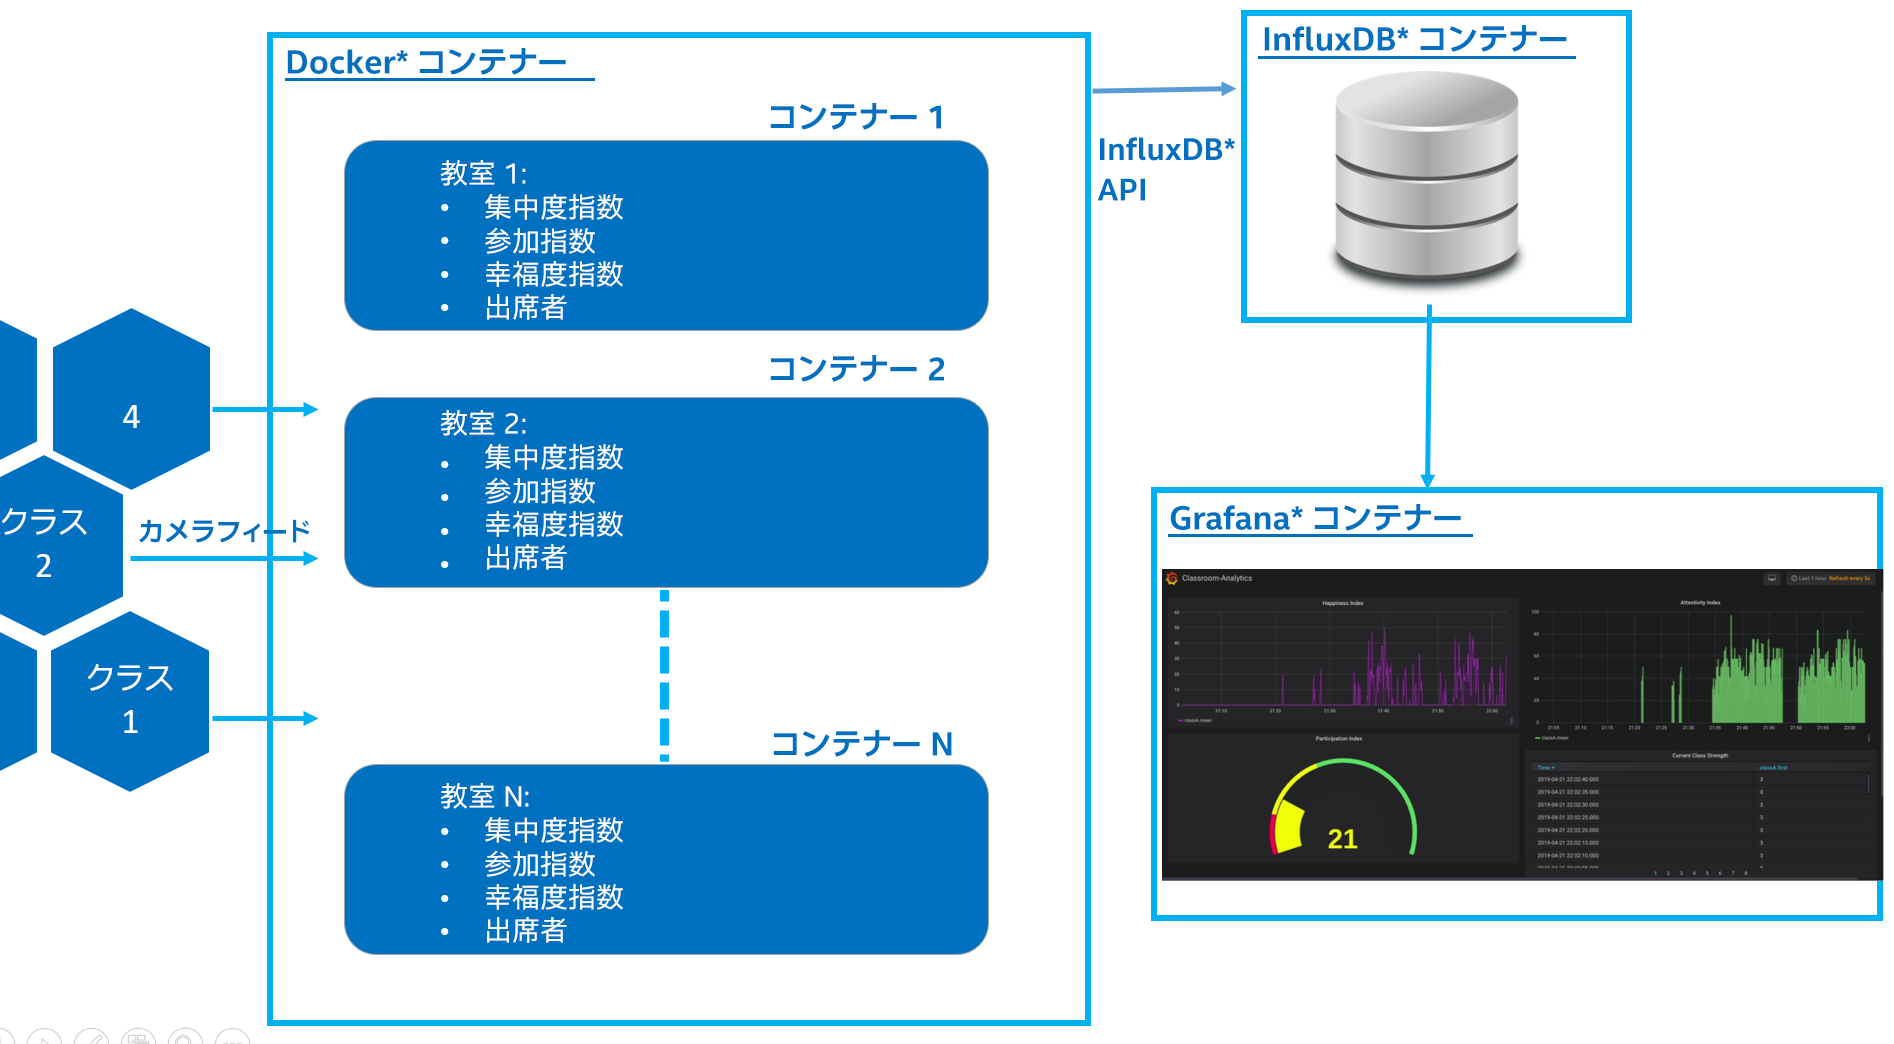
図:12: 複数のクラスは複数のコンテナーを意味する
複数の教室にアプリケーションをスケーリングするため、次のコマンドを使用して複数のコンテナーを作成します。
cd intelligent-classroom
sudo docker-compose up --scale classroom-analytics=<N>
Note: N=2 or 3 etc..
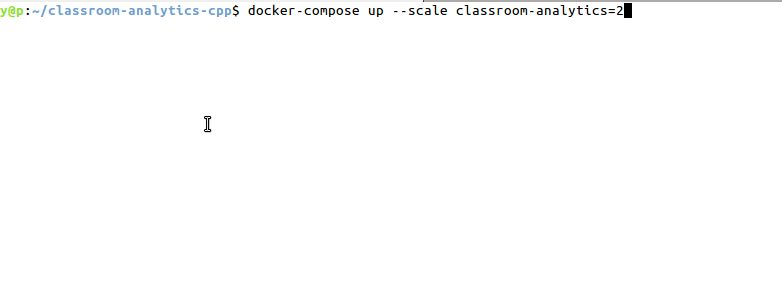
図:13: 複数の教室をサポートする compose コマンドを実行する
classroom-analytics イメージの N のコンテナー・インスタンスが作成されます。各コンテナーにログインし、上記の手順で示されたコマンドを実行して特定の教室のデータを取得できます。
コンテナーを実行しているコンテナー ID を取得するには、次のコマンドを使用します。
sudo docker ps -aqf "name=classroom-analytics"
Exp:
92de4bfxxxxx
58dba92xxxxx
次のコマンドを使用して異なる端末でコンテナーにログインします。
sudo docker exec -it <container ID> /bin/bash
コンテナーのコンソールで、上記で示されたアプリケーションを実行するコマンドを実行します。--i IP カメラストリームと --cs (セクション) フラグ入力は追加する新しい教室ごとに変更する必要があります。
例えば、2 つの教室 9B と 10B があるとします。2 つの異なる端末でコンテナーにログインした後、次のコマンドを実行します。
教室 1 : 名前 = 9B
cd root/inference_engine_samples_build/intel64/Release/
source /opt/intel/openvino/bin/setupvars.sh
./classroom-analytics -pdc=/resources/intel/person-detection-action-recognition-0005/FP32/person-detection-action-recognition-0005.xml -c=/resources/intel/face-detection-adas-0001/FP32/face-detection-adas-0001.xml -lrc=/resources/intel/landmarks-regression-retail-0009/FP32/landmarks-regression-retail-0009.xml -pc=/resources/intel/head-pose-estimation-adas-0001/FP32/head-pose-estimation-adas-0001.xml -sc=/resources/intel/emotions-recognition-retail-0003/FP32/emotions-recognition-retail-0003.xml -frc=/resources/intel/face-reidentification-retail-0095/FP32/face-reidentification-retail-0095.xml -fgp=/opt/intel/openvino/inference_engine/samples/classroom_analytics/faces_gallery.json -i=<Ip Of the Ip Camera/Location of video File (/resources/classroom.mp4)/ cam> --influxip=<Ip of InfluxDB Container/172.21.0.6> --noshow=1 --cs=9B
教室 2 : 名前 = 10B
cd root/inference_engine_samples_build/intel64/Release/
source /opt/intel/openvino/bin/setupvars.sh
./classroom-analytics -pdc=/resources/intel/person-detection-action-recognition-0005/FP32/person-detection-action-recognition-0005.xml -c=/resources/intel/face-detection-adas-0001/FP32/face-detection-adas-0001.xml -lrc=/resources/intel/landmarks-regression-retail-0009/FP32/landmarks-regression-retail-0009.xml -pc=/resources/intel/head-pose-estimation-adas-0001/FP32/head-pose-estimation-adas-0001.xml -sc=/resources/intel/emotions-recognition-retail-0003/FP32/emotions-recognition-retail-0003.xml -frc=/resources/intel/face-reidentification-retail-0095/FP32/face-reidentification-retail-0095.xml -fgp=/opt/intel/openvino/inference_engine/samples/classroom_analytics/faces_gallery.json -i=<Ip Of the Ip Camera/Location of video File (/resources/classroom.mp4)/ cam> --influxip=<Ip of InfluxDB Container/172.21.0.6> --noshow=1 --cs=10B
注: クラスセクション (--cs) のデフォルトが 9B になるように resources/Grafana.json ファイルを変更します。
Grafana* で、同じ Grafana.json ファイルをインポートし、ダッシュボードの個々のパネルを編集して、アプリケーションのフラグで指定された名前になるように教室の名前を変更します。パネルを編集するには、パネル名をクリックしてドロップダウン・メニューから [Edit] を選択します。完了したら変更を保存します。

図:14: Grafana* にクラスを追加する
USB カメラでテストする
USB カメラでテストするには、カメラをホストマシンの USB ポートに接続します。
アプリケーションを実行するときに、USB カメラのビデオを使用するオプションとして、-i=cam を使用します。
複数の教室コンテナーの docker-compose を実行する場合、カメラは 1 つのコンテナーのみアクセスできます。
注
追加の教室コンテナーを同時に実行すると、全体的な推論レートは低下します。
出席者はクラスの途中に計算されます。例えば、timetable.txt でクラスが午前 10 時に開始する場合、その科目の出席者は午前 10 時 30 分に計算されます。
推論の全体的な精度は個々のモデルの解像度とモデルの精度に依存します。詳細は、インテル® ディストリビューションの OpenVINO™ ツールキットの事前トレーニング済みモデルの概要 (英語) を参照してください。
トラブルシューティング
launch.sh スクリプトを実行すると次のエラーが表示された場合、
Error : Pool overlaps with other one on this address space
クローンしたディレクトリー (intelligent-classroom) に移動して下記のコマンドを実行してください。
docker-compose down